You can integrate Rho with your accounting software to automate the reconciliation process and eliminate manual data entry.
To connect Rho to your Microsoft Dynamics 365 Business Central account, follow the step-by-step instructions below. If you need any assistance during the set-up process, contact our Customer Success team at 1 (855) 7-GETRHO or clientservice@rho.co, and we will gladly assist you.
Get started in Rho:
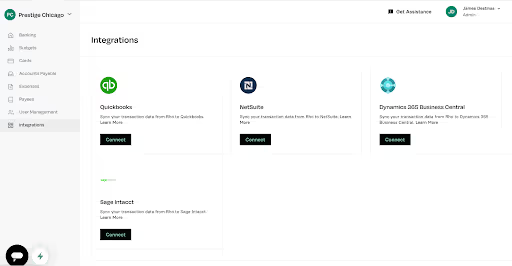
- Sign in to Rho, and navigate to the Integrations tab in the left-hand navigation bar.
- On the Integrations page, click Connect under Microsoft Dynamics 365 Business Central

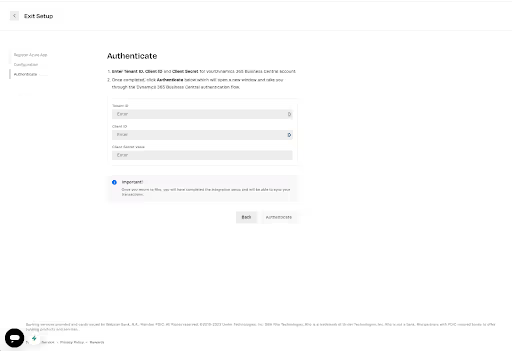
You’ll then see two pages with instructions on retrieving the following Microsoft Dynamics 365 Business Central information needed to complete the integration in Rho:
- Tenant ID
- Client ID
- Client Secret Value
We recommend following the steps below to retrieve this information from your Azure account using a separate browser tab before proceeding to the Authenticate page in Rho. You will need this info to complete your integration.
How to Access Tenant ID, Client ID, and Client Secret Value in Microsoft Dynamics 365 Business Central
To retrieve the Tenant ID and Client ID information,
- Sign in to your Azure portal
- Switch to the tenant you want to connect to Rho
- Using the search box at the top of the page, search for Azure Active Directory
- Under the Manage section located in the left-hand navigation bar, select App registrations
- Then select + New registration located at the top of the page.
- Next, complete the form as follows:
- Name: Create a name for the integration (example:Rho Integration)
- Supported Account types: Select the supported account types most applicable to your company
- Note: Your selection here is not relevant to Rho's integration
- Redirect URI (optional): Select Web from the Redirect URI dropdown and enter https://api.rho.co/webhook/business_central_authorize_callback
- Click Register to continue to the Overview application page
- Under the Essentials section from the center of the Overview application page, note the values for the listed Client ID and Tenant ID.
- Later, you’ll paste the Client ID and Tenant ID into a form on Rho.
To retrieve the Client Secret Value information,
- Select Certificates & secrets under the Manage section located in the left-hand navigation bar.
- Navigate to the Client secrets tab.
- Click + New client secret
- Use the side menu pop-up to add a client secret (example: Rho Integration Secret)
- Choose from the drop-down menu (example: 365 days (12 Months))
- Copy the code under Value and store it in a safe place, as it will disappear and can only be saved once. You will need this information for later.
- Next, select API permissions under the Manage section located in the left-hand navigation bar.
- Under Configured permissions, click +Add a permission
- Under Microsoft APIs, select Dynamics 365 Business Central
- Under What type of permissions does your application require?, select Delegated permissions
- Under the Financials section, choose Access Dynamics 365 Business Central as the signed-in-user
- Click Add permissions
Navigate Back to Rho & Complete the Final Step
Now that you have this information, follow the step-by-step instructions below:
- From the Authenticate page of the integration set-up in Rho, paste in the Tenant ID, Client ID, and Client Service Value you retrieved from the integration setup in Microsoft Dynamics 365 Business Central
- Click Authenticate

Congratulations, your Rho account is now set up to integrate with Microsoft Dynamics 365 Business Central.
Once the integration is set up, we recommend signing back in to Rho to complete the following steps:
- To set up your account and transaction coding preferences, use our create mapping rules article
- To set up your syncing preferences - use our How to sync transactions article


.svg)


.avif)
.avif)