How to connect to an external bank account

Connecting External Bank Accounts

Rho partners with Plaid, Mastercard Data Connect and Stripe Financial Connections (SFC) to allow you to securely connect an external bank account. If your bank supports this functionality, linking a business checking account will allow you to initiate a linked-account transfer to fund your Rho account.

To link an account, follow the steps below:

  1. Click Settings from the Toolbar on the left, then under the Business section choose External Bank Accounts.

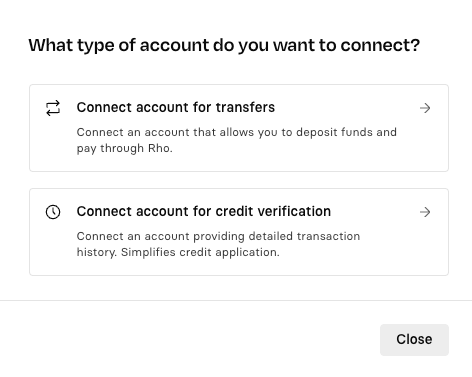
  2. On this page, click the grey “Link Account” button in the top right corner of your screen. You will be prompted to choose between connecting an account for transfers or for credit verification.

  3. Follow the instructions to access your external financial institution and connect. From the Select Your Institution prompt, click the icon associated with your bank or enter the name of your bank in the Search field and select it. Enter your credentials, or a Login page for the bank displays. Enter the username and password associated with the external account and click Submit. After you validate the transaction via two-step authentication, when configured, the external account is linked to your Rho account and is listed in the Linked Accounts section.

  4. From the Select Your Institution prompt, click the icon associated with your bank or enter the name of your bank in the Search field and select it.

  5. Enter your credentials, and a Login page for the bank displays. Enter the username and password associated with the external account and click Submit. After you validate the transaction via two-step authentication, when configured, the external account is linked to your Rho account and is listed in the Linked Accounts section.

Screenshot 2024-05-16 at 17.54.31.png

Once connected, you can fund your Rho account and set up automatic card payments from your linked account.

Note: If you have multiple checking accounts under one Business, you will not be able to directly link a "sub-account" to an external account. All external accounts are linked to the Rho account as a whole (subs included). However, when going to "deposit funds" in your Banking tab using our linked account feature, you can choose which sub-account to send funds to and from which linked external account the funds will originate.

Troubleshooting

Below are some of the errors you may encounter when connecting to your external bank account.

Incorrect Credentials

Your bank did not accept the username and password you used to log into your external bank account. Ensure you are using the same username and password you normally use to log into your third-party bank.

If there were multiple institutional selections available for your bank (e.g., SVB Go vs SVB Online Banking), please ensure you selected the correct institution. If you are logging into the incorrect institution, you will receive an Incorrect Credentials error even if your username and password are correct.

Additionally, some banks use a special "third-party application password" or "allow third-party access" setting for additional security. In this case, you will need to ensure you use this special password instead of the password you use to log into your financial institution directly on their website.

Please reach out to Rho Client Service if you've verified your username and password but the error persists.

Incorrect Institution

Some institutions have different websites for their business and personal accounts. Always make sure you are choosing the institution you use for business banking.

If you don't see your bank when you attempt to connect, try the second connection provider (Rho works with both Plaid and Mastercard Data Connect) or reach out to Rho Client Service.

Temporary Connection Issue

There may be temporary connection issues with our providers (Plaid and Mastercard Data Connect). Please wait a few minutes and try again.

Authentication or Permission Issue

These types of issues might arise when there is an authentication or permission problem with your account or user credentials which prevents a connection.

Common causes:

  • An incorrect answer to a security question presented by your institution

  • Your Multi-factor authentication (MFA) device is inactive

  • Your institution failed to send the one-time code for MFA authentication

  • Your institution requires a special security configuration before third-party account connections can be established

  • Your account is not fully set up at your institution

  • Your institution is blocking access due to an administrative task that requires completion

  • You or another user for your bank account did not agree to share, or has revoked, access to the data required for connection

  • Your user credentials or permissions do not allow you to connect your account to external platforms

Verify your institution's account settings to ensure third-party providers can connect and that you have active access to your account. Additionally, you may need to verify with your bank account admin to ensure you have sufficient credentials to create a connection. Alternatively, try connecting to a different account and institution. If the issue persists, try with a different connection provider (we support Plaid and Mastercard Data Connect) or submit a support ticket

Linking multiple accounts from the same institution

You can link external bank accounts for either deposits (account transfers) or credit verification.

However, if you attempt to link two different accounts from the same financial institution, only one connection can remain active at a time:

At this time, Rho does not support maintaining two separate connections from the same institution for different use cases.

Popular help center articles

Most read this week.

Accounting

How to set up Rho's QuickBooks Integration

The following instructions describe how to set up a direct integration between your Rho Account and your existing QuickBooks Online account. If you're interested in connecting Rho transactions via the QuickBooks Bank Feed, see instructions here . Note: this integration is only compatible with QuickBooks Online. For QuickBooks Desktop, you can download a CSV of transactions from your Rho account via these steps and upload them to QB Desktop). Once you are signed into the Rho platform, click Integrations in the navigation bar. Click the QuickBooks icon. Follow the login instructions to connect to your QuickBooks account. When finished, click Accounting in the navigation bar. Select the transactions you want to sync. Click the Sync button. When you connect Quick Books to Rho, a new account is added to your CHART OF ACCOUNTS tab named RHO [Checking Acct#] , where [Checking Acct#] is the 10-digit account number associated with the linked Rho account. This is your primary account and is required for automatic account reconciliation. You can rename this account, but integration between your Rho account and Quickbooks will not work if the account is deleted. What information can I view in the Accounting Tab? Once you have connected QuickBooks to Rho, use the Accounting Tab in the Rho platform to manage mapping rules, view transactions, and make necessary changes. The Accounting Tab includes two subsections Dashboard and Mapping Rules. Learn more about what you can view in the Dashboard here and about what you see in the Mapping Rules here. Important Integration Notes Syncing with your QuickBooks account is a manual process. Each time you want to reconcile your Rho Account in QuickBooks, you must click the Sync button. However, you can set up automatic recurring syncs by going to the settings tab within your accounting workflow and setting a recurring sync.

General Rho Information

How Do I Contact Support?

Reach out to our dedicated Rho specialists anytime over the phone at 1 (855) 7-GETRHO, through email at clientservice@rho.co, or start a live chat by logging into your Rho account (web or app), clicking the Help button in the lower left, and selecting 24/7 live support.

Cards

How to Add Your Rho Card to your Digital Wallet

Your virtual & physical Rho cards can now be added to your Apple or Google Wallet for a quick, contactless, and secure way to pay. Note: Currently, we don't support adding Rho cards to WeChat. Set up is simple - follow the steps below to get started: Apple Wallet Go to your Wallet app and click the + button in the right-hand corner. Select the Card Type “Credit”. Hold your Rho physical card's chip near your device or place it directly on the screen. For a virtual card, choose the “Enter Card Details Manually” option to add your card. Verify your card details are correct and enter your 3-digit CVV security code. You should notice the "Card Added" confirmation after a few moments. For your added security, you may be asked to verify your Rho Card account via two-factor authentication by “Text Message”, “Email”, or "Authenticator App", if you have set it up. A six-digit code will be sent to your email address, phone number on file, or the Authenticator App, enter your code in the field provided. Your Rho Card is now active in your Apple Wallet and ready to use at contactless point-of-sale terminals that support Apple Pay. For more information, see Apple’s support document . How to use your Rho Card in Apple Pay at a contactless point-of-sale terminal Select your Rho Card via the Apple Wallet app. Double-click the right-hand button on the side of your iPhone when a near contactless point-of-sale terminal. Verify your identity using Face ID or your Passcode. You will now be prompted to hold your phone near the contactless reader. Hold near the reader until the purchase has been completed. Google Wallet Your virtual & physical Rho cards can now be added to your Google Wallet on your Android device for a quick, contactless, and secure way to pay. Set up is simple - follow the steps below to get started: Open your Google Pay (GPay) app on your Android device and click the image of a card in the right-hand corner. This will open a screen that shows you all the cards you have linked to your wallet. Select “Add a Card” at the bottom of the screen. Select the Payment Method “Credit or debit card.” Take a picture of your Rho physical card or the virtual card in your Rho dashboard. Your phone will recognize your card details and then you must enter your 3-digit CVV security code. Alternatively, you may enter your card details manually. Make sure your address, ZIP code, and phone number match your settings in your Rho account. The address should be your organization’s billing address. Press Save. Review Rho’s Terms & Conditions and click “Accept & continue.” For your added security, you may be asked to verify your Rho Card account via two-factor authentication by “Text Message” or “Email.” After you receive your six-digit verification code by text or email, enter it and click Submit. Your Rho Card is now active in your Wallet and ready to use at contactless point-of-sale terminals that support Google Pay. For more information visit the Google Pay Help Center

Mobile App

How to Upload a Receipt in the Mobile App

You can add receipts to all Rho Card transactions within the app ( in addition to desktop, email, and SMS uploads ). To add a receipt, open the Rho app and tap on the transaction requiring a receipt. In the Attachments section, click "Upload Receipt" and choose one of the following options: Select an image from your camera roll Take a photo of your receipt using your camera Select and upload a file Note: Be sure to include any applicable tip amount on your receipt. In the transaction details window, you can also add departments, labels, and notes to your transaction.